Preface
Some information on this post is outdated! Google Views has been migrated to Google Maps / Google Street View. Outdated information has been struck through.
Google added a new feature to their set of web based applications recently. Publishing geo located spherical panoramas (aka Photo Spheres) on Views.
In another article, Markus already described the complete workflow which is needed to publish a panoramic image on Views and embed it into your website.
In this article I will describe several methods of writing and displaying the mandatory meta data which is used by a photo sphere.
The methods are
- Using the website http://street-sphere.appspot.com/
- Using ExifToolGUI, ExifTool and a special workspace definition file (Windows only, read and write)
- Using a batch file and ExifTool (command-line only, droplet for Windows available, read and write)
- Using a custom metadata panel within Photoshop (tested with PS C6, PS CC, read and write)
- ExifMetaLrPlugin for Lightroom (tested with Lr 4, read)
As a prerequisite we assume that you already have geotagged your images. It is important to note, that you need at least latitude, longitude and the heading in the final image. For example you can do this with Geosetter on Windows, or with ExifTool.
1. Using the website
Google set up the website http://street-sphere.appspot.com, where you can upload a JPG image and populate the required metadata. Unfortunately you have to be online and you have to up- and download the files. And not every filetype is supported. Otherwise it works fine, you just have to follow the instructions on the website.
2. ExifToolGUI and the GPano workspace
As ExifToolGUI is only available for Windows, you can skip to the other solutions if you run a different operating system on your machine.
First install the latest version of ExifTool by Phil Harvey. Be sure to get the stand-alone Windows executable, extract it to a path of your choice and rename it to
exiftool.exe
and copy it to a location which is already part of your search path.
Then install the latest version of ExifToolGUI as described on the homepage in section “2. ExifToolGUI” at the top of the page.
Save the following lines to a path of your choice with the filename
GPano.ini
[WorkspaceTags]
EXIF=-GUI-SEP
Image Width=-ImageWidth^[8000] Don't change unless you know, what you do!
Image Height=-ImageHeight^[4000] Don't change unless you know, what you do!
EXIF GPS=-GUI-SEP
GPS Latitude=-GPS:GPSLatitude^No Hint defined
GPS Longitude=-GPS:GPSLongitude^No Hint defined
Heading (EXIF)=-GPS:GPSImgDirection^[120.15] Direction in ° from [0] to [359.99]
GPano=-GUI-SEP
StitchingSoftware=-XMP-GPano:StitchingSoftware^[PTGui Pro 9.1.8]
ProjectionType=-XMP-GPano:ProjectionType^only [equirectangular] is currently supported by Google products
UsePanoramaViewer=-XMP-GPano:UsePanoramaViewer^[TRUE] if image should show as photosphere
Heading (Pano)=-XMP-GPano:PoseHeadingDegrees^[135] direction in the middle of the image in degrees. N=0, E=90, S=180, W=270
CroppedWidth=-XMP-GPano:CroppedAreaImageWidthPixels^[8000] for full spheres the same as FullPanoWidth
CroppedHeight=-XMP-GPano:CroppedAreaImageHeightPixels^[4000] for full spheres the same as FullPanoHeight
FullPanoWidth=-XMP-GPano:FullPanoWidthPixels^[8000] width of image canvas
FullPanoHeight=-XMP-GPano:FullPanoHeightPixels^[4000] heigth of image canvas
CroppedLeft=-XMP-GPano:CroppedAreaLeftPixels^[0] within full sphere
CroppedTop=-XMP-GPano:CroppedAreaTopPixels^[0] within full sphere
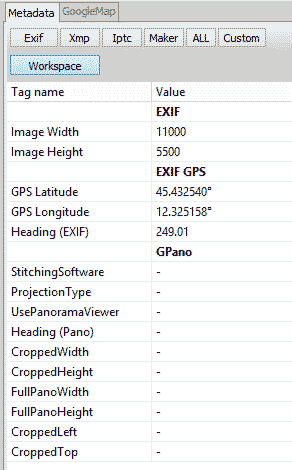
Open the file with ExifToolGUI (Menu>Program>Workspace definition file>Load…). Open the Metadata panel and open the Workspace. You should see the following workspace:
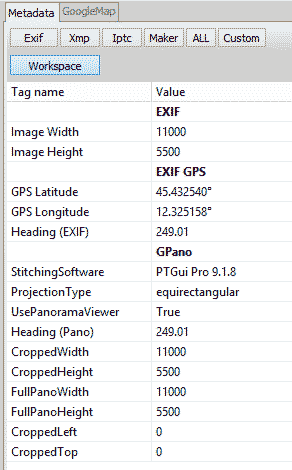
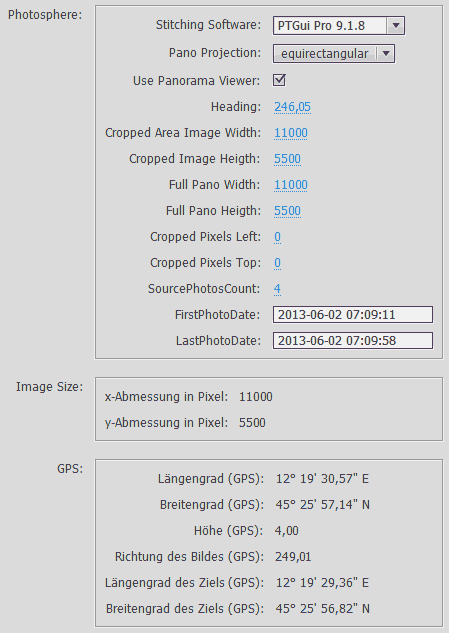
As reference the next screenshot shows an already populated photo sphere:
3. ExifTool via command-line
First install the latest version of ExifTool by Phil Harvey for your operating system.
Start exiftool from the command-line with the following parameters:
-ProjectionType="equirectangular" -UsePanoramaViewer="True" -"PoseHeadingDegrees<$exif:GPSImgDirection" -"CroppedAreaImageWidthPixels<$ImageWidth" -"CroppedAreaImageHeightPixels<$ImageHeight" -"FullPanoWidthPixels<$ImageWidth" -"FullPanoHeightPixels<$ImageHeight" -CroppedAreaLeftPixels="0" -CroppedAreaTopPixels="0"
Of course you also have to add a filename. If you supply the filename of a panoramic image in equirectangular format, which covers the full sphere, you get a photo sphere with the same name of the original image.
If you create a batch file on the desktop of a Windows machine with the following content:
FOR %%A IN (%*) DO (
"C:\Program Files (x86)\Geo\GeoSetter\tools\exiftool.exe" -ProjectionType="equirectangular" -UsePanoramaViewer="True" -"PoseHeadingDegrees<$exif:GPSImgDirection" -"CroppedAreaImageWidthPixels<$ImageWidth" -"CroppedAreaImageHeightPixels<$ImageHeight" -"FullPanoWidthPixels<$ImageWidth" -"FullPanoHeightPixels<$ImageHeight" -CroppedAreaLeftPixels="0" -CroppedAreaTopPixels="0" %%A
)
PAUSE |
FOR %%A IN (%*) DO (
"C:\Program Files (x86)\Geo\GeoSetter\tools\exiftool.exe" -ProjectionType="equirectangular" -UsePanoramaViewer="True" -"PoseHeadingDegrees<$exif:GPSImgDirection" -"CroppedAreaImageWidthPixels<$ImageWidth" -"CroppedAreaImageHeightPixels<$ImageHeight" -"FullPanoWidthPixels<$ImageWidth" -"FullPanoHeightPixels<$ImageHeight" -CroppedAreaLeftPixels="0" -CroppedAreaTopPixels="0" %%A
)
PAUSE
Then you have a droplet on which you can drop an equirectangular panoramic image which covers the full sphere and it gets populated with the required fields to be accepted as a photo sphere. If your image supplies the GPS-heading it’s also compliant with the requirements of Google-Maps.
4. Metadata panel and Photoshop
First you have to check the documentation of Adobes Custom File Info Panel to identify the proper location for the File Panels. On a Windows system running PS CC the files are located in
C:\Users\[Username]\AppData\Roaming\Adobe\XMP\Custom File Info Panels\4.0\panels
Create a directory named
photosphere
Create a file named
properties.xml
with the following content:
<!--?xml version="1.0" encoding="UTF-8"?-->
<!--
Copyright 2013 by Jürgen Matern (/author/juergen/)

This file is licensed under the Creative Commons Attribution ShareAlike 3.0
License (http://creativecommons.org/licenses/by-sa/3.0/).

In short: you are free to share and make derivative works of the file under
the conditions that you appropriately attribute it and that you distribute
it only under a license identical to this one.

Photosphere File Info Panel (properties.xml)

This panel implements the specific XMP fields of Photospheres.
Additionally it displays additional fields of the image as read only fields.
-->

<xmp_definitions xmlns:ui="http://ns.adobe.com/xmp/fileinfo/ui/">

	<xmp_schema prefix="GPano" namespace="http://ns.google.com/photos/1.0/panorama/" label="$/Custom/GPano/Photosphere=Photosphere" description="$/Custom/GPano/Description/Photosphere=This schema displays the required properties for photospheres.">
		<xmp_property name="StitchingSoftware" category="external" label="$/Custom/GPano/StitchingSoftware=Stitching Software:" type="openchoice" ui:width="20%">
			<xmp_choice raw_value="PTGui Pro 9.1.8" label="PTGui Pro 9.1.8">
			<xmp_choice raw_value="PTGui 9.1.8" label="PTGui 9.1.8">
			<xmp_choice raw_value="Hugin" label="Hugin">
		</xmp_choice></xmp_choice></xmp_choice></xmp_property>
		<xmp_property name="ProjectionType" category="external" label="$/Custom/GPano/ProjectionType=Pano Projection:" description="$/Custom/GPano/Description/ProjectionType=Currently Google applications only support equirectangular projection." type="closedchoice" ui:width="20%">
			<xmp_choice raw_value="equirectangular" label="$/Custom/GPano/equirectangular=equirectangular">
			<xmp_choice raw_value="" label="$/Custom/GPano/none=none specified">
		</xmp_choice></xmp_choice></xmp_property>
		<xmp_property name="UsePanoramaViewer" category="external" label="$/Custom/GPano/UsePanoramaViewer=Use Panorama Viewer:" type="boolean">
		<xmp_property name="PoseHeadingDegrees" category="external" label="$/Custom/GPano/PoseHeadingDegrees=Heading (at center of image):" description="$/Custom/GPano/Description/PoseHeadingDegrees=This field is only mandatory for Google Maps." type="real" ui:width="15%">
		<xmp_property name="CroppedAreaImageWidthPixels" category="external" label="$/Custom/GPano/CroppedAreaImageWidthPixels=Cropped Area Image Width:" type="integer" ui:format="{0} pixel" ui:width="15%">
		<xmp_property name="CroppedAreaImageHeightPixels" category="external" label="$/Custom/GPano/CroppedAreaImageHeightPixels=Cropped Image Heigth:" type="integer" ui:format="{0} pixel" ui:width="15%">
		<xmp_property name="FullPanoWidthPixels" category="external" label="$/Custom/GPano/FullPanoWidthPixels=Full Pano Width:" type="integer" ui:format="{0} pixel" ui:width="15%">
		<xmp_property name="FullPanoHeightPixels" category="external" label="$/Custom/GPano/FullPanoHeightPixels=Full Pano Heigth:" type="integer" ui:format="{0} pixel" ui:width="15%">
		<xmp_property name="CroppedAreaLeftPixels" category="external" label="$/Custom/GPano/CroppedAreaLeftPixels=Cropped Pixels Left:" type="integer" ui:format="{0} pixel" ui:width="15%">
		<xmp_property name="CroppedAreaTopPixels" category="external" label="$/Custom/GPano/CroppedAreaTopPixels=Cropped Pixels Top:" type="integer" ui:format="{0} pixel" ui:width="15%">
	</xmp_property></xmp_property></xmp_property></xmp_property></xmp_property></xmp_property></xmp_property></xmp_property></xmp_schema>
	<xmp_schema prefix="exif" namespace="http://ns.adobe.com/exif/1.0/" label="$/Custom/EXIF/Fieldname/ImageDimensions=Image Dimensions" description="$/Custom/EXIF/Description/IMageDimensions=This schema displays the image dimensions from the EXIF header.">
		<xmp_property name="PixelXDimension" category="internal" label="$/Custom/EXIF/Fieldname/PixelXDimension=Image Width:" type="integer" ui:format="{0} pixel">
		<xmp_property name="PixelYDimension" category="internal" label="$/Custom/EXIF/Fieldname/PixelYDimension=Image Height:" type="integer" ui:format="{0} pixel">
		<ui:separator>
	</ui:separator></xmp_property></xmp_property></xmp_schema>
	<xmp_schema prefix="exif" namespace="http://ns.adobe.com/exif/1.0/" label="$/Custom/EXIF/Fieldname/GPSCoordinates=GPS coordinates" description="$/Custom/EXIF/Description/GPSCoordinates=This schema displays the GPS coordinates from the EXIF header.">
		<xmp_property name="GPSLongitude" category="internal" label="$/Custom/EXIF/Fieldname/GPSLongitude=GPS longitude (camera):" type="text">
		<xmp_property name="GPSLatitude" category="internal" label="$/Custom/EXIF/Fieldname/GPSLatitude=GPS latitude (camera):" type="text">
		<xmp_property name="GPSAltitude" category="internal" label="$/Custom/EXIF/Fieldname/GPSAltitude=GPS altitude (camera):" type="text">
		<xmp_property name="GPSImgDirection" category="internal" label="$/Custom/EXIF/Fieldname/GPSImgDirection=GPS image direction:" type="real">
		<xmp_property name="GPSDestLongitude" category="internal" label="$/Custom/EXIF/Fieldname/GPSDestLongitude=GPS longitude (motif):" type="text">
		<xmp_property name="GPSDestLatitude" category="internal" label="$/Custom/EXIF/Fieldname/GPSDestLatitude=GPS latitude (motif):" type="text">
	</xmp_property></xmp_property></xmp_property></xmp_property></xmp_property></xmp_property></xmp_schema>

</xmp_definitions> |
<!--?xml version="1.0" encoding="UTF-8"?-->
<!--
Copyright 2013 by Jürgen Matern (/author/juergen/)
This file is licensed under the Creative Commons Attribution ShareAlike 3.0
License (http://creativecommons.org/licenses/by-sa/3.0/).
In short: you are free to share and make derivative works of the file under
the conditions that you appropriately attribute it and that you distribute
it only under a license identical to this one.
Photosphere File Info Panel (properties.xml)
This panel implements the specific XMP fields of Photospheres.
Additionally it displays additional fields of the image as read only fields.
-->
<xmp_definitions xmlns:ui="http://ns.adobe.com/xmp/fileinfo/ui/">
<xmp_schema prefix="GPano" namespace="http://ns.google.com/photos/1.0/panorama/" label="$/Custom/GPano/Photosphere=Photosphere" description="$/Custom/GPano/Description/Photosphere=This schema displays the required properties for photospheres.">
<xmp_property name="StitchingSoftware" category="external" label="$/Custom/GPano/StitchingSoftware=Stitching Software:" type="openchoice" ui:width="20%">
<xmp_choice raw_value="PTGui Pro 9.1.8" label="PTGui Pro 9.1.8">
<xmp_choice raw_value="PTGui 9.1.8" label="PTGui 9.1.8">
<xmp_choice raw_value="Hugin" label="Hugin">
</xmp_choice></xmp_choice></xmp_choice></xmp_property>
<xmp_property name="ProjectionType" category="external" label="$/Custom/GPano/ProjectionType=Pano Projection:" description="$/Custom/GPano/Description/ProjectionType=Currently Google applications only support equirectangular projection." type="closedchoice" ui:width="20%">
<xmp_choice raw_value="equirectangular" label="$/Custom/GPano/equirectangular=equirectangular">
<xmp_choice raw_value="" label="$/Custom/GPano/none=none specified">
</xmp_choice></xmp_choice></xmp_property>
<xmp_property name="UsePanoramaViewer" category="external" label="$/Custom/GPano/UsePanoramaViewer=Use Panorama Viewer:" type="boolean">
<xmp_property name="PoseHeadingDegrees" category="external" label="$/Custom/GPano/PoseHeadingDegrees=Heading (at center of image):" description="$/Custom/GPano/Description/PoseHeadingDegrees=This field is only mandatory for Google Maps." type="real" ui:width="15%">
<xmp_property name="CroppedAreaImageWidthPixels" category="external" label="$/Custom/GPano/CroppedAreaImageWidthPixels=Cropped Area Image Width:" type="integer" ui:format="{0} pixel" ui:width="15%">
<xmp_property name="CroppedAreaImageHeightPixels" category="external" label="$/Custom/GPano/CroppedAreaImageHeightPixels=Cropped Image Heigth:" type="integer" ui:format="{0} pixel" ui:width="15%">
<xmp_property name="FullPanoWidthPixels" category="external" label="$/Custom/GPano/FullPanoWidthPixels=Full Pano Width:" type="integer" ui:format="{0} pixel" ui:width="15%">
<xmp_property name="FullPanoHeightPixels" category="external" label="$/Custom/GPano/FullPanoHeightPixels=Full Pano Heigth:" type="integer" ui:format="{0} pixel" ui:width="15%">
<xmp_property name="CroppedAreaLeftPixels" category="external" label="$/Custom/GPano/CroppedAreaLeftPixels=Cropped Pixels Left:" type="integer" ui:format="{0} pixel" ui:width="15%">
<xmp_property name="CroppedAreaTopPixels" category="external" label="$/Custom/GPano/CroppedAreaTopPixels=Cropped Pixels Top:" type="integer" ui:format="{0} pixel" ui:width="15%">
</xmp_property></xmp_property></xmp_property></xmp_property></xmp_property></xmp_property></xmp_property></xmp_property></xmp_schema>
<xmp_schema prefix="exif" namespace="http://ns.adobe.com/exif/1.0/" label="$/Custom/EXIF/Fieldname/ImageDimensions=Image Dimensions" description="$/Custom/EXIF/Description/IMageDimensions=This schema displays the image dimensions from the EXIF header.">
<xmp_property name="PixelXDimension" category="internal" label="$/Custom/EXIF/Fieldname/PixelXDimension=Image Width:" type="integer" ui:format="{0} pixel">
<xmp_property name="PixelYDimension" category="internal" label="$/Custom/EXIF/Fieldname/PixelYDimension=Image Height:" type="integer" ui:format="{0} pixel">
<ui:separator>
</ui:separator></xmp_property></xmp_property></xmp_schema>
<xmp_schema prefix="exif" namespace="http://ns.adobe.com/exif/1.0/" label="$/Custom/EXIF/Fieldname/GPSCoordinates=GPS coordinates" description="$/Custom/EXIF/Description/GPSCoordinates=This schema displays the GPS coordinates from the EXIF header.">
<xmp_property name="GPSLongitude" category="internal" label="$/Custom/EXIF/Fieldname/GPSLongitude=GPS longitude (camera):" type="text">
<xmp_property name="GPSLatitude" category="internal" label="$/Custom/EXIF/Fieldname/GPSLatitude=GPS latitude (camera):" type="text">
<xmp_property name="GPSAltitude" category="internal" label="$/Custom/EXIF/Fieldname/GPSAltitude=GPS altitude (camera):" type="text">
<xmp_property name="GPSImgDirection" category="internal" label="$/Custom/EXIF/Fieldname/GPSImgDirection=GPS image direction:" type="real">
<xmp_property name="GPSDestLongitude" category="internal" label="$/Custom/EXIF/Fieldname/GPSDestLongitude=GPS longitude (motif):" type="text">
<xmp_property name="GPSDestLatitude" category="internal" label="$/Custom/EXIF/Fieldname/GPSDestLatitude=GPS latitude (motif):" type="text">
</xmp_property></xmp_property></xmp_property></xmp_property></xmp_property></xmp_property></xmp_schema>
</xmp_definitions>
Create a second file named
manifest.xml
with the following content:
<!--
Copyright 2013 by Jürgen Matern (/author/juergen/)

This file is licensed under the Creative Commons Attribution ShareAlike 3.0
License (http://creativecommons.org/licenses/by-sa/3.0/).

In short: you are free to share and make derivative works of the file under
the conditions that you appropriately attribute it and that you distribute
it only under a license identical to this one.

Photosphere File Info Panel (manifest.xml)
-->

<xfi:fileinfo xmlns:xfi="http://ns.adobe.com/xmp/fileinfo/">
	<xfi:panels>
		<xfi:panel name="Photosphere" label="Photosphere" description="Properties for Photospheres" type="generic" version="1.0.5" panellibrary="generic" panelclass="examples.panels.generic.GenericPanel" propertydescriptionfile="properties.xml" localizationfile="Photosphere" modifydate="2013-08-25Z" visible="true">
		</xfi:panel>
	</xfi:panels>
</xfi:fileinfo> |
<!--
Copyright 2013 by Jürgen Matern (/author/juergen/)
This file is licensed under the Creative Commons Attribution ShareAlike 3.0
License (http://creativecommons.org/licenses/by-sa/3.0/).
In short: you are free to share and make derivative works of the file under
the conditions that you appropriately attribute it and that you distribute
it only under a license identical to this one.
Photosphere File Info Panel (manifest.xml)
-->
<xfi:fileinfo xmlns:xfi="http://ns.adobe.com/xmp/fileinfo/">
<xfi:panels>
<xfi:panel name="Photosphere" label="Photosphere" description="Properties for Photospheres" type="generic" version="1.0.5" panellibrary="generic" panelclass="examples.panels.generic.GenericPanel" propertydescriptionfile="properties.xml" localizationfile="Photosphere" modifydate="2013-08-25Z" visible="true">
</xfi:panel>
</xfi:panels>
</xfi:fileinfo>
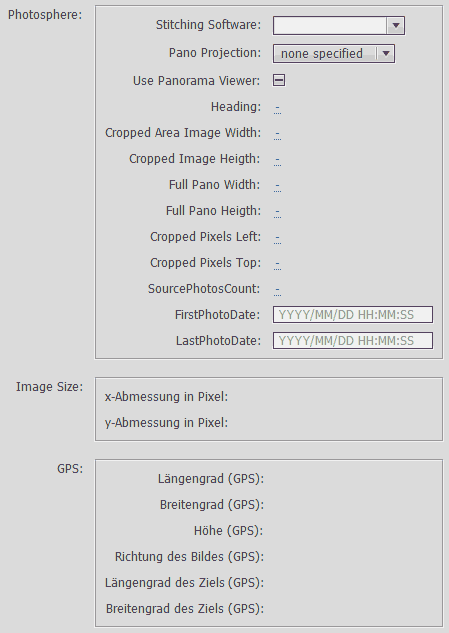
Then open the file info dialog of Photoshop. When all the metadata is missing, the new dialog looks like this:

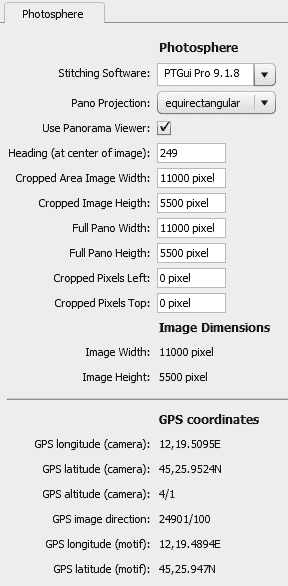
And the following screenshot shows the dialog, when the metadata fields are already populated.
5. ExifMetaLrPlugin for Lightroom
First install the latest version of ExifTool by Phil Harvey for your operating system. Then install the latest version of ExifMetaLrPlugin. Configure the plugin to display the metadata. Unfortunately this solution is read only at the time of the writing of the article.

 Show on map

 . Press it and you will be able to select one of your Photo Spheres uploaded to Google Plus. After confirming the selection the panorama will be added to your gallery. However it may take some time for it to show up. The panorma will also be published on Google Maps – after a review process
 and press it. You’ll see a small window from which you can copy the required HTML iframe – code to embed the panorama on a web page.
