Comparing image crops of Sony LA-EA2 and Sony LA-EA4 on Sony ILCE-7 (with Sony SAL70200G @ 200mm)

Today I did some tests with the two lens adapters Sony LA-EA2 and Sony LA-EA4, which can be used to adapt a lens with a Sony A-mount to a camera with an Sony E-mount. In another article I already compared looks and weigth of the two adapters. In this article I focus on the different image crops when you use the two adapters on a full frame camera with E-mount. I used a Sony ILCE-7 for my tests. On a Sony ILCE-7r the crops are the same, but you get a higher pixel count.

I only tested the Sony 70-200/2.8 (SAL70200G) at 200mm. I used the lens collar of the lens to attach it to a tripod. The lens, the tripod and the subject were not moved after that.

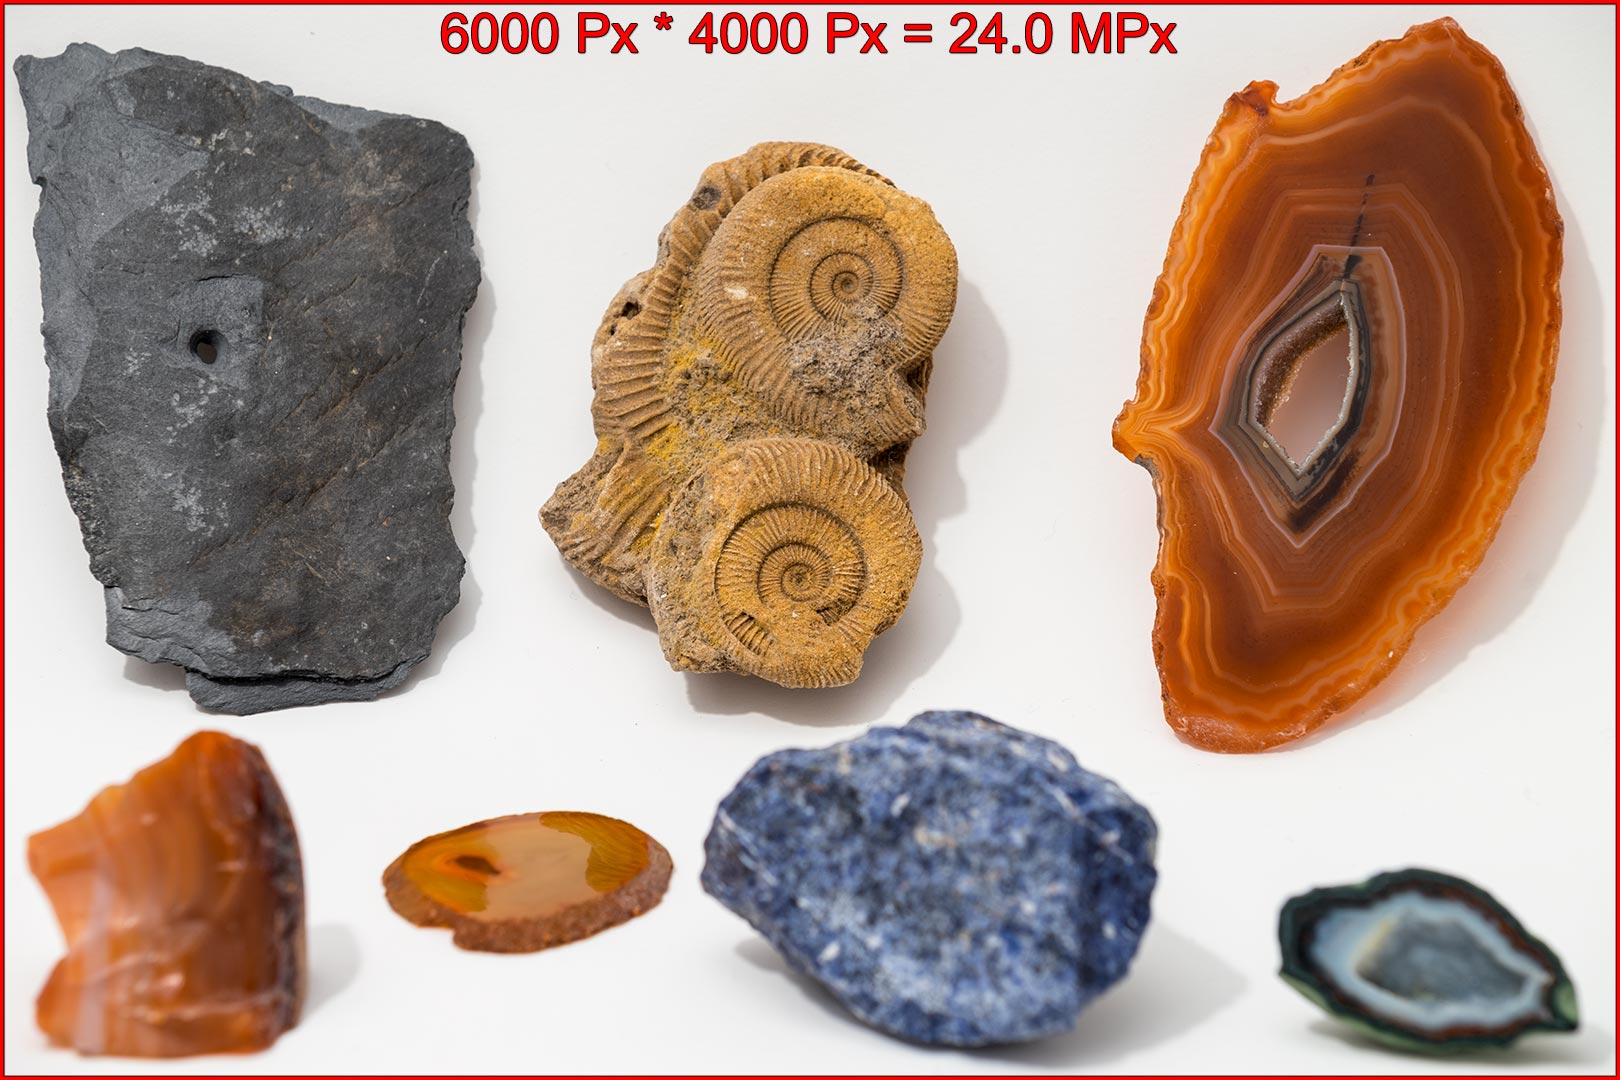
The first image shows the result when using the LA-EA4. The resulting image is the full resolution of the sensor.

Image when using the SAL70200G with LA-EA4 on a Sony ILCE-7 (@ 200mm)

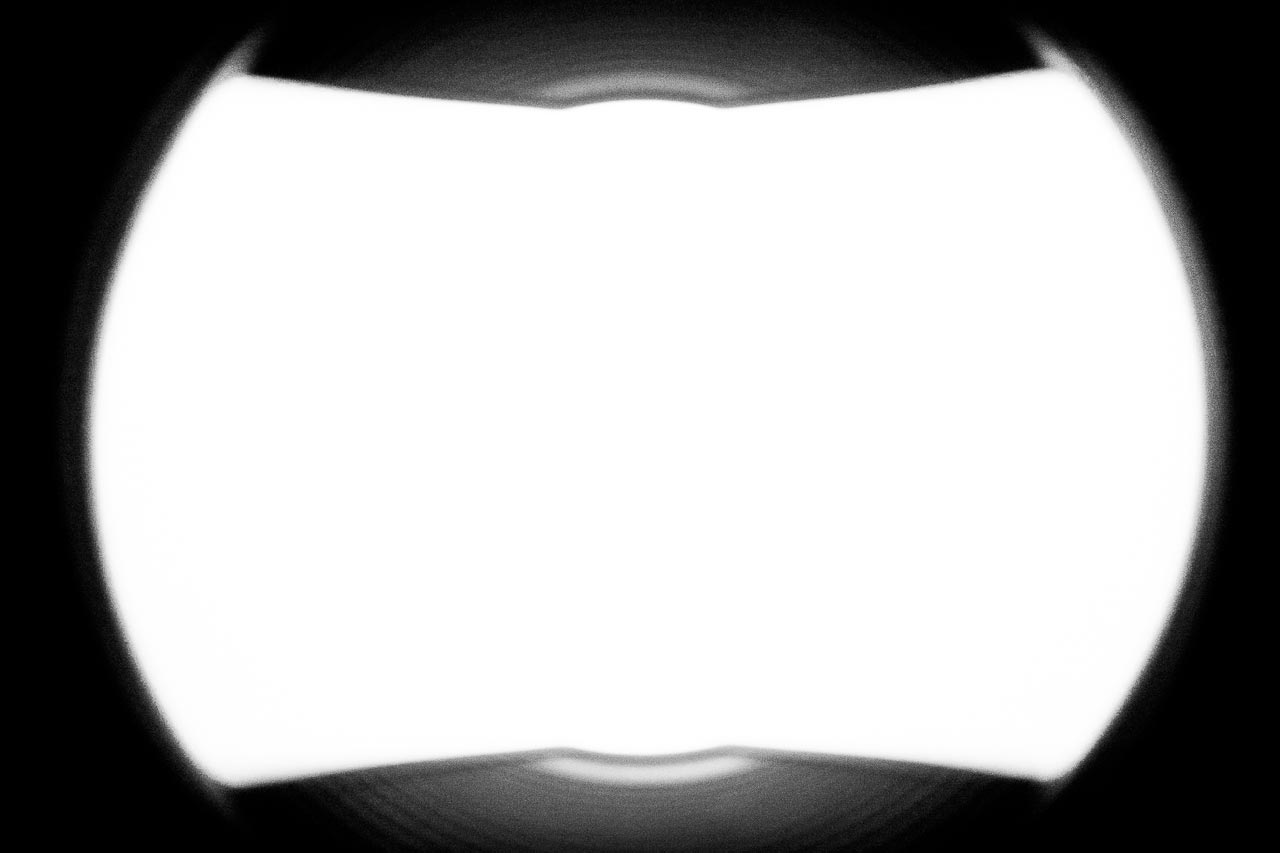
For the second image I only exchanged the LA-EA4 with the older LA-EA2. For this image I used the following configuration of the camera: Menu → Custom Settings (gear icon) → 5 → APS-C Size Capture → Off. You can clearly see the shading of the LA-EA2 on the sensor. The maximum manual crop is marked with the green rectangle.

Image when using the SAL70200G with LA-EA2 on a Sony ILCE-7 (@ 200mm, maximum crop)

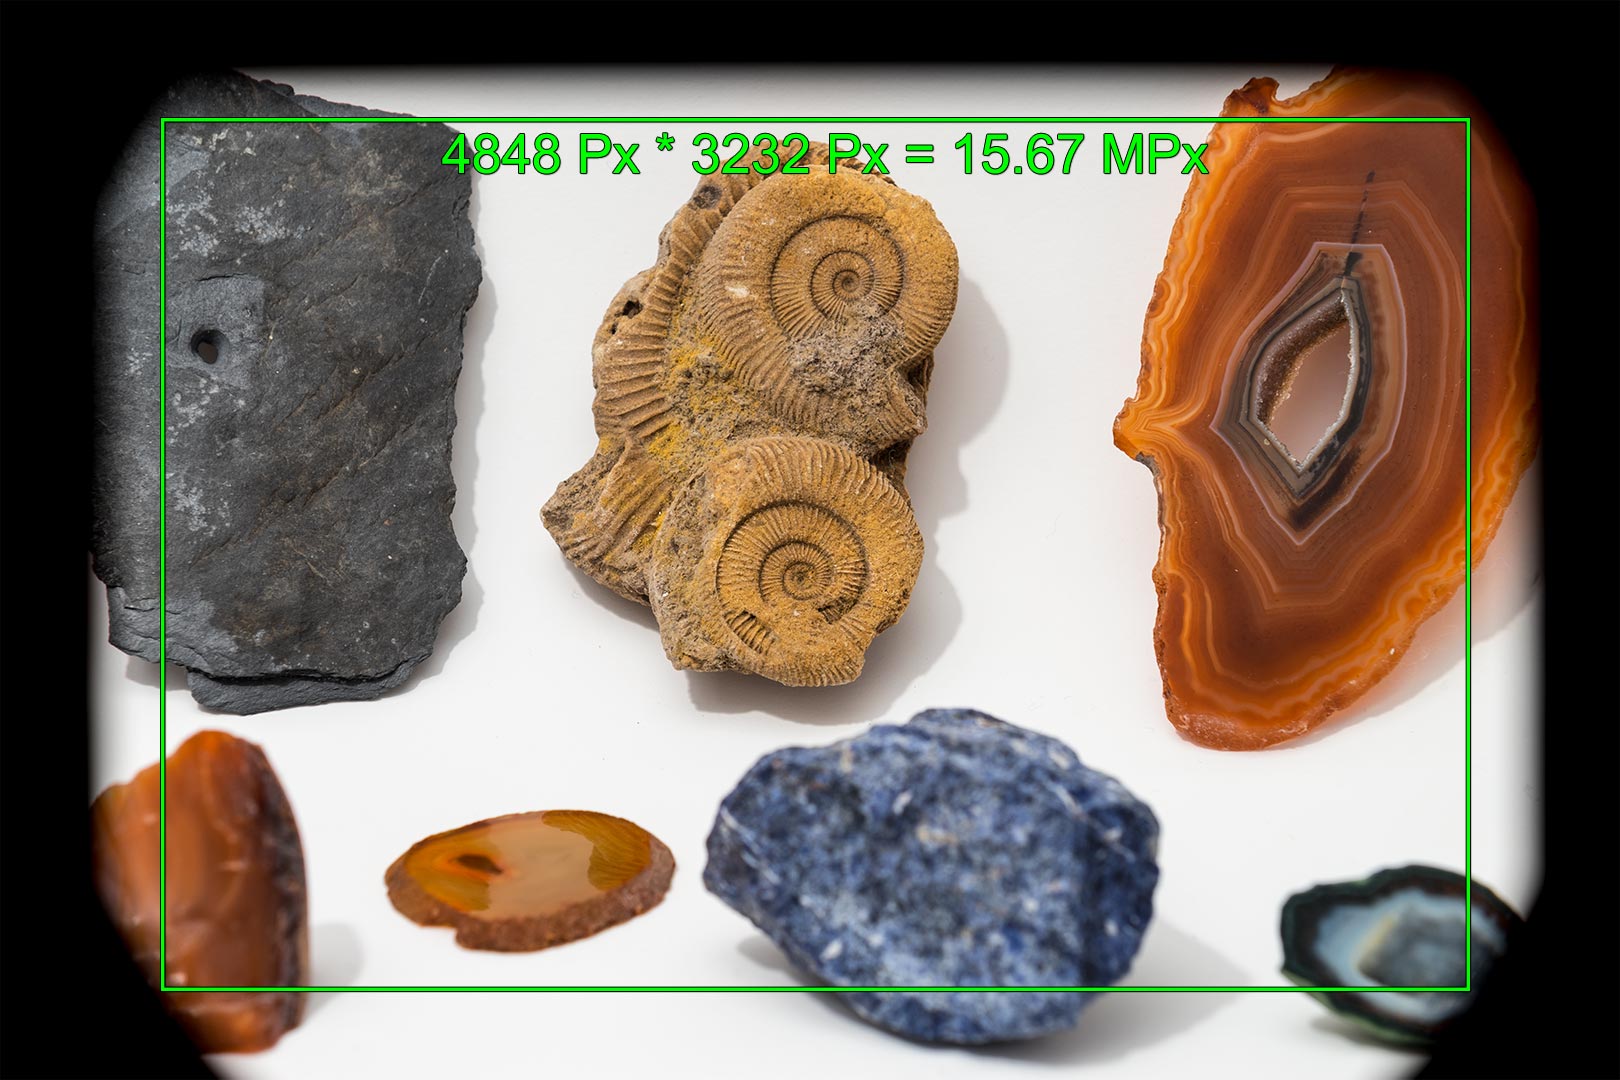
For the next image I only changed one setting in the camera: Menu → Custom Settings (gear icon) → 5 → APS-C Size Capture → On. The resulting image showed an even larger crop than the second image but no shading of the adapter. In postprocessing I superpositioned the two images to be able to mark the camera crop in the second image. This is the result.

Image when using the SAL70200G with LA-EA2 on a Sony ILCE-7 (@ 200mm, camera crop)

In the last image I used the first taken picture and marked the three different crops. The red marker is the LA-EA4, the green marker is the LA-EA2 with maximum manual crop and the blue marker is LA-EA2 with cropping enabled in camera.

Comparison of image crops when using LA-EA2 and LA-EA4 in a Sony ILCE-7

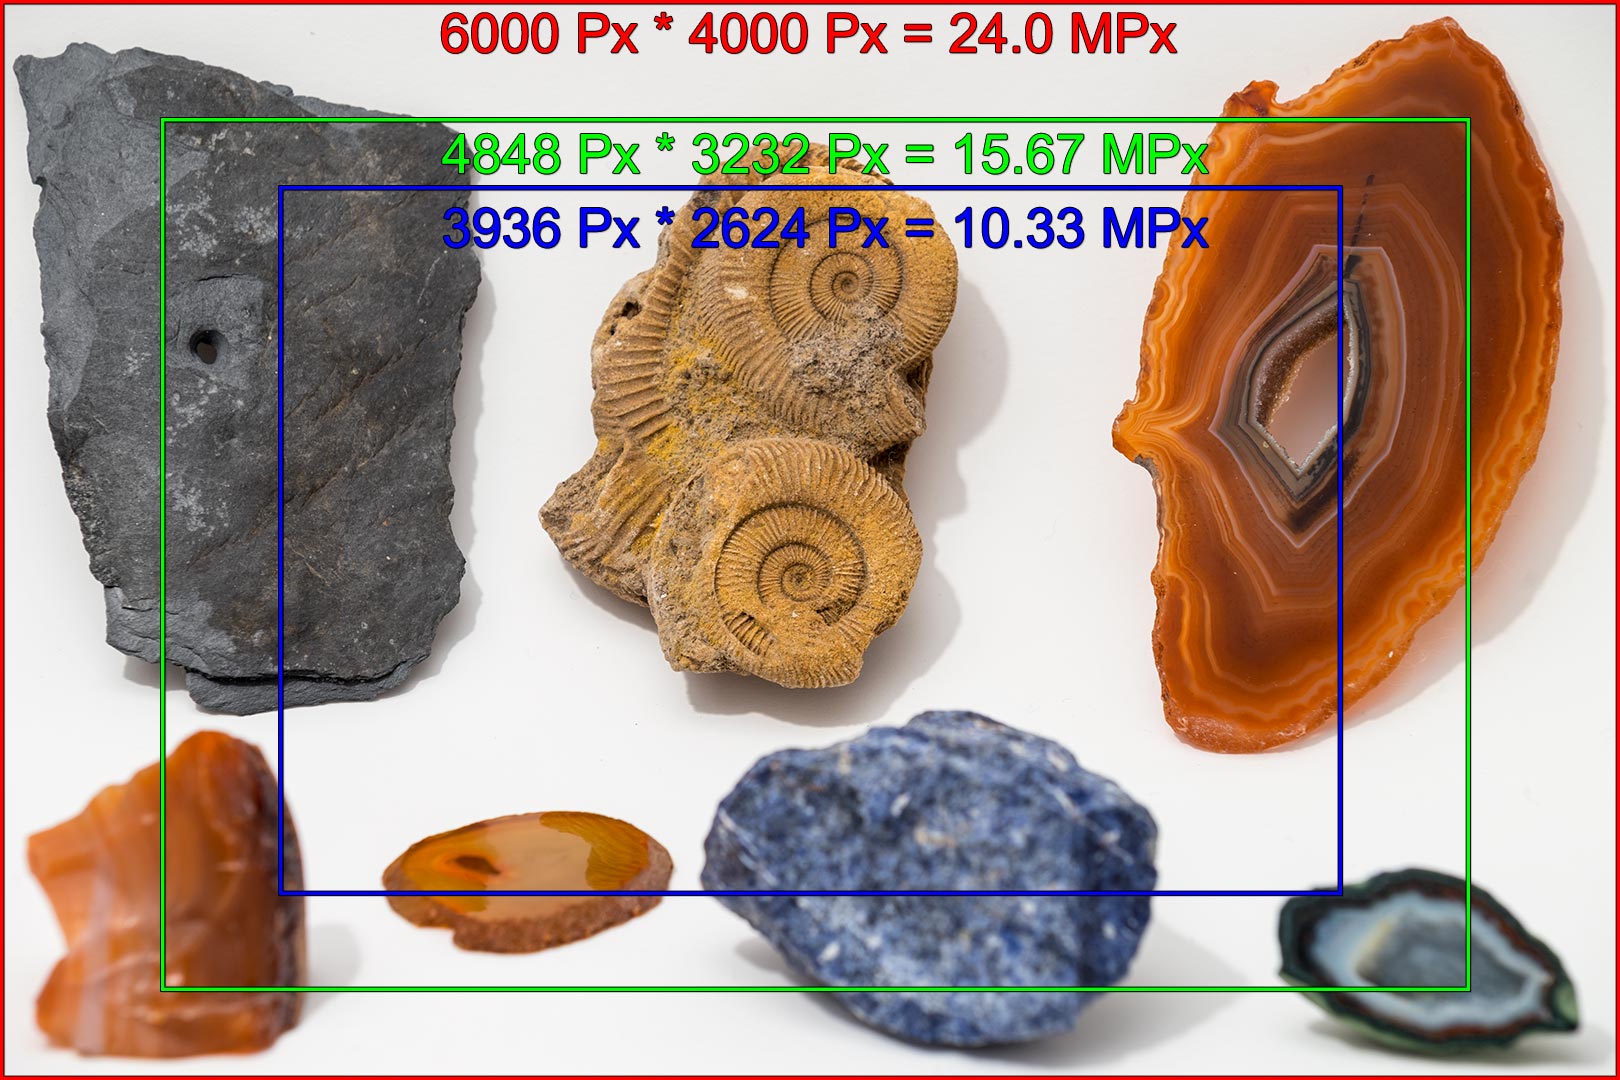
The maximum manual crop (which is equivalent to the unshaded area of the sensor) will differ when you use a different lens. And it also differs with different focal lengths of a zoom lens. But this needs some more testing.

Shaving the lens hood of the Samyang (Bower, Rokinon, Walimex) 8mm fisheye lens for usage on the Sony E-mount with full-frame sensors

The Samyang 8mm/2.8 UMC II fisheye lens is available for several camera mounts (Canon M, Fujifilm X, Samsung NX and Sony E). It is designed as a full frame fisheye which covers 180° from corner to corner on these aforementioned mounts with their respective sensor sizes. But since the introduction of the Sony cameras with E-mount and full frame sensor there is an interesting new option for panoramic photographers.

In all the featured examples of this post I just took a picture of a white piece of paper bended around the lens which I converted to a black and white image afterwards.

If you mount the lens in its original state on a Sony ILCE-7 (or ILCE-7r) then you get an image which looks something like this.

Samyang 8mm/2.8 UMC Fisheye on Sony ILCE-7 (original lens hood)

You can clearly see, that the lens hood shades a good part of the image. Which is of course a bad thing if we want to shoot a spherical with this lens.

In the next example I therefore used a side cutter to remove the plastic lens hood on the longer side of the sensor.

Samyang 8mm/2.8 UMC Fisheye on Sony ILCE-7 (lens hood of long side shaved)

And in the final example I removed as much of the lens hood as I could. This is the final resulting image.

Samyang 8mm/2.8 UMC Fisheye on Sony ILCE-7 (lens hood completely shaved)

In this state the lens covers approximately 190° on the long side of the sensor. With three or four images easily covering the full sphere the final equirectangular is 10000 pixels by 5000 pixels in size on a Sony ILCE-7.

You can already find a daylight, blue hour and indoor example from Markus which were all shot with a shaved version of the lens and a Sony ILCE-7.

Additional remark

The shown images were produced with an Samyang 8mm/2.8 UMC II fisheye lens on a SONY ILCE camera with a full frame sensor. You can gat a nearly identical result if you use the Samyang 7mm/3.5 UMC fisheye lens with a SONY ILCE camera with APS-C sized sensor and an micro 4/3 to E-mount adapter.

Tilt experiments with Kipon Tilt adapter for Nikon lenses on Sony NEX cameras

Kipon manufactures an adapter which enables you to mount any lens with a Nikon F-mount to your Sony NEX camera. Additionally the adapter can be tilted in any direction. Tilting in this context means, that the lens is pivoted out of the optical axis of the lens.

The two following images illustrate this concept. In the first image the lens was tilted to the right (from the photographers point of view). In the second image the lens was tilted to the left (from the photographers point of view).

Nikon Nikkor 20mm/2.8 AI-s on Sony NEX-7 (tilted right)
Nikon Nikkor 20mm/2.8 AI-s on Sony NEX-7 (tilted left)

You can use a tilted lens to orient the plane of focus of your optical system in special ways. Normally you use a tilting lens so that the plane of focus is oriented in a way which maximizes the visually sharp areas of your image. Theodor Scheimpflug was the first person who described these facts and therefore the priciple is called the Scheimpflug principle.

But in the following example I tilted the lens in order to orient the plane of focus in a way which minimized the sharp areas of the image. As this looks nearly identical to a very shallow depth of field, the observer mostly gets the impression, that he is only looking on a photographed mock-up of a landscape rather than a real landscape.

Tilt experiment with Kipon NIK-NEX adapter and Nikon Nikkor 20mm/2.8 AI-s on Sony NEX-5

In order to get this image, the lens was tilted and the camera was pointed down. Back at home, the vertical lines of the buildings were brought back to vertical alignment. In other words I tilted in the real world and shifted in the digital world…

Another Experiment With a Cinemagraph

The original footage has been taken from a Full- HD movie. I exported some frames of the film to individual images and used Photoshop CS6 to create this cinemagraph (in fact it’s an animated GIF image).

View over Husavik harbour

Lessons learned: Use a tripod!

As I didn’t use a tripod in the shoot, I had to align each of the images to minimize the movement between frames.

SLR Magic 35/f1.7 on Sony NEX 5

The SLR Magic 35mm/F1.7 is a manual lens and is available with an E-Mount, that fits on the Sony NEX camera series.
To be able to use it, you have to make sure you tweak some settings in your camera:

  1. Make sure you enable the shooting without a lens: Menu → Setup → Release w/o lens → Enable
  2. Before you continue make sure you have Firmware ≥ Ver. 04 installed! Check this using Menu → Setup → Version. When you have an older version installed download the latest version from the Sony support site here.
  3. Enable the MF Assist function using Menu → Setup → MF Assist → 2 Sec
    You can choose between No Limit — 2 Sec — 5 Sec.
  4. Enable the Peaking Level using Menu → Setup → Peaking Level → Mid
    You can choose between Low — Mid — High.
  5. Choose your Peaking Color using Menu → Setup → Peaking Color → Red
    You can choose between YellowRed — White.

Switch your camera to A- Mode (aperture priority) and use the MF Assist button to get a perfectly sharp picture even when shooting the lens wide open with f/1.7!

You find some example shots in this post.

See a very detailed review of the lens here.

SLR Magic 35/f1.7
SLR Magic 35/f1.7
SLR Magic 35/f1.7 on Sony NEX 5

24h Snowing and Raining (timelapse video)

I was searching for a first project I wanted to shoot with my new gadget. The remote trigger for the Sony NEX 5 I presented in the previous post. I decided to shoot a timelapse video. As I did not have my time lapse trigger with me but a laptop I applied some changes to the code and the time lapse function for the Ultimate Trigger was born.

I programmed a fixed interval of 10 minutes between each shot, set the camera to aperture priority mode, set the focus to manual and started shooting for 24 hours. Every now and then I checked the progress and had some minor problems:

  1. After the first two hours the servo had moved and did not trigger any more.
  2. After the first six hours the Ultimate Trigger battery has been drained, however I noticed this after about the time, when more than four hours of shots were missing.
  3. After half the shooting time the Sony NEX battery was about half empty. As I did not have a spare one with me I recharged it several times for 9 minute intervals between the 10 minute shooting intervals.

Apart from these minor flaws I am satisfied with the result you can see here:

24h Snowing and Raining

24 hours of snow and rain captured using a Sony NEX 5 and the Ultimate Trigger.

QR Code Business Card