Öxarárfoss is a waterfall in Þingvellir National Park (Iceland). It’s heigth is approximately 20 meters (about 66 feet). It’s name is derived from the river Öxará.
 Show on map
This is the blog of the PanoTwins
Öxarárfoss is a waterfall in Þingvellir National Park (Iceland). It’s heigth is approximately 20 meters (about 66 feet). It’s name is derived from the river Öxará.
Show on map
Hallgrímskirkja is a church in Reykjavík (Iceland). It is the largest church of the island. It is also the second tallest building in Iceland.
Show on map
In a post from yesterday I analyzed a series of images from the Voigtländer Ultra Wide Heliar 12mm/5.6 on my Sony NEX-7 in order to identify the best aperture for maximum resolution. I wondered about the impact of my corrections at the stage of post-processing the images. To answer this question I picked the image taken with an aperture of f=8 and compare a uncorrected and a corrected version of the image.
While post-processing the uncorrected image I did the following:
 with marked crop locations, taken with CV 12mm/5.6 (at f=8) on Sony NEX-7")
While post-processing the corrected image I did the following:
 with marked crop locations, taken with CV 12mm/5.6 (at f=8) on Sony NEX-7")
For each of the marked locations in the full image I extracted a square (250 pixel * 250 pixel) which I will present at it’s original resolution. These images are not sharpened except for the same input sharpening with the raw converter. They are saved for web with a quality-setting of 60%.
")
")
In my opinion it’s clearly visible that the applied correction didn’t reduce the resolution of the image and therefore the identification of the best aperture for maximum resolution is not affected by these corrections.
Recently I started using a Voigtländer Ultra Wide Heliar 12mm/5.6 on my Sony NEX-7. In two other articles I already described how to configure your NEX-7 for maximum assistance with manual lenses, how to attach the lens to the camera and how to post-process the images to eliminate the magenta cast in the corners.
As I am aware of the fact, that any combination of lens and body has it’s maximum sharpness at a specific aperture I did a series of test images to find this maximum. My subject was the front of a building. It has a nearly flat surface and the clinker bricks contain a lot of fractal details. The camera was mounted on a tripod whose distance to the wall was approximately 15 meters (approximately 50 feet). Images were taken with self-timer to prevent any camera-shake. Focus was set at the first exposure which was taken at f=5.6. The image quality was set to RAW (6,000 pixel * 4,000 pixel).
While post-processing the images I did the following:
The following image (at f=8) was scaled to 1,500 pixel * 1,000 pixel, sharpened and saved for web with a quality-setting of 60%.
For each of the marked locations in the full image I extracted a square (250 pixel * 250 pixel) which I will present at it’s original resolution. These images are not sharpened except for the same input sharpening with the raw converter. They are saved for web with a quality-setting of 60%.


In my opinion it’s easy to see that the Voigtländer Ultra Wide Heliar 12mm/5.6 reaches it’s maximum sharpness at an aperture around 8 on a Sony NEX-7. If you stop further down diffraction starts to limit the resolution. For further reading on this issue try to start at this page at diglloyd.com.
Show on map
In a recent article I described, why the E-mount of the Sony ILCE-7 is so interesting for people with legacy lenses and how to configure your Sony ILCE-7 to assist when taking pictures with these lenses. In another article I also described, how to get rid of the magenta cast in the corners when you are using ultra wide lenses on the Sony NEX-system.
And here is another example of a legacy ultra wide lense adapted to the E-mount.

Originally this lens was constructed for the M39 screw-mount of early Leica cameras. So you could either use an Novoflex NEX/LEI adapter or you use an M-Bayonet Adapter and the Novoflex NEX/LEM adapter. Depending on your other lenses one of this options should suit your needs. Personally I use the second option and I don’t have any problems while focusing.
If you’d like to read an intensive review of the lens then take a look at this page.
In a previous article I wrote about the possibility of attaching nearly every interchangable lens to the NEX camera system via an appropriate adapter. And I already told you how you can configure your NEX so that it’s easier to work with your legacy lenses.
But there is still a problem when you use ultra wide lenses originally designed for the Leica-M camera system. Depending on the lens you get a strong coloured cast in the corners of your image. Meanwhile this problem is well described throughout the web. For example in an article of Luminous Landscape, the blog of Steve Huff or the blog of Jim Kasson.
My own experiences confirm these observations. Depending on the lens (and of course your subject) you get a strong coloured cast which you can’t ignore. The following example shows an image which was taken with the NEX-7 and the Voigtländer Ultra Wide Heliar 12mm/5.6. At the stage of post-processing I didn’t apply any correction for any of the known lens defects (like chromatic aberration or distortion) nor did I correct for coloured corners or vignetting.

But at the cost of additional post-processing there is a solution available which is based on the free software cornerfix (which is available for Mac and PC). At the stage of post-processing I didn’t apply any correction for any of the known lens defects (like chromatic aberration or distortion) but I did correct the coloured corners and vignetting with cornerfix.

Before I corrected the corners I generated my own lens-correction-profiles. Therefore I followed these instructions. For the flat field reference file I took a picture through a matted glass panel.

After that I followed the instructions for correcting images with cornerfix. I’m very pleased with the results and at the cost of some additional post-processing I get perfectly usable files from my legacy ultra wide lenses on my NEX-7. In the following example I corrected the coloured corners and vignetting with cornerfix and I corrected the lens defects (chromatic aberration, distortion) within Adobe camera raw. Some digital shifting, a crop to 3:4 and adding again some vignette completed the modifications of this image.

For the additional post-processing with cornerfix you need files in the DNG format. And to convert the Sony ARW files from the NEX-7 to DNG you will need at minimum the version 6.6 of the Adobe DNG converter. As my workflow was already based on the DNG format the additional post-processing is not much of an issue 🙂
The lens mount of the Sony NEX camera system is called E-mount. The E stands for Eighteen, as the flange focal distance of the Sony NEX camera series is exactly eighteen millimeters. Most interchangeable lens systems use a longer flange focal distance and therefore you can adapt nearly every available lens to the E-mount of the Sony NEX camera system.
In this case I used the NEX/LEM adapter from Novoflex to adapt an Voigtländer Ultra Wide Heliar 12mm/5.6 to a Sony NEX-7. On a full frame sensor this setup equals to a focal length of 18mm.
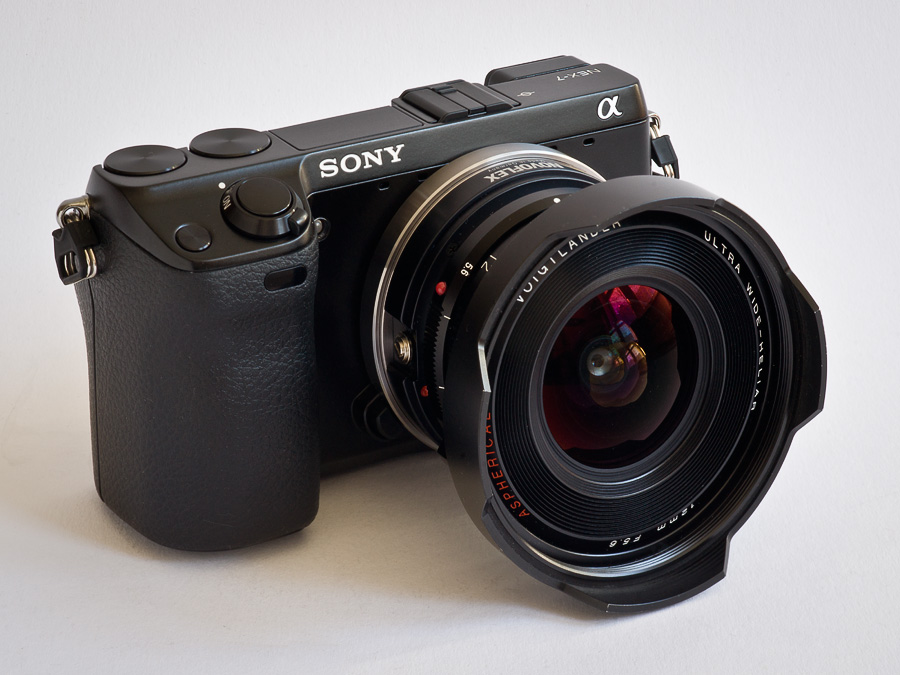
You must be aware that this combination only allows manual control. But the Sony NEX camera system assists in the use of manual lenses if the camera is proper configured:
Switch your camera to A- Mode (aperture priority) and use the MF Assist button to get a perfectly sharp picture even when shooting a fast lens wide open.