Preface
Some information on this post is outdated! Google Views has been migrated to Google Maps / Google Streeet View. Outdated information has been
struck through.
Google added a nice feature to their set of web based applications recently. Publishing geo located spherical panoramas (aka Photo Spheres) on Views.
Once these panoramas are published they can also be embedded in other web sites. This article explains how you can achieve this.
Prerequisites:
- A Google+ account (Get one here).
- An equirectangular panorama (or a full 360° cylindrical panorama)
Step1: Create an equirectangular image
Use your favourite stitching software to create an equirectangular image. I usually use PTGui for this purpose. But there are plenty of other solutions available:
Step2: Add Photo Sphere meta data to your panorama
When dealing with Google a spherical panorama is called a Photo Sphere. But in fact this is only just an equirectangular image containing special meta data tags embedded in the file. You find the official Photo Sphere meta data documentation here. Starting with Android Version 4.2 (Jelly Bean) mobile phones can be used to create them directly. When you are working with the conventional workflow of a panoramic photographer you have to add this information into the image manually. There are several ways possible to achieve this, the methods are covered in a separate post.
Step 3: Upload your Photo Sphere to Maps
There are several options available:
One of the easiest ways is to search for a place in Maps. When the place is found there is a section with photos. A small icon should show which says: Add a photo. Just click it, upload a Photo Sphere and you’re done!
One even easier way is to use the Street View App on Android or iOS
The following steps are mostly outdated (old workflow with Views), and are only here for reference purposes
Step 3: Check your Google Plus default image settings
Important: Before you proceed to upload your images there are two settings you should check on your Google Plus settings:
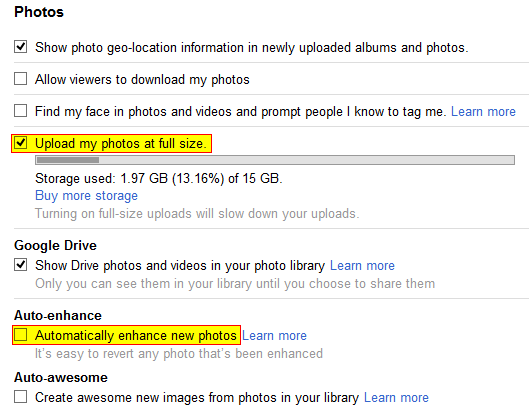
I think the two most important settings you should check are:
- Upload my photos at full size to be checked ON. Otherwise your images are scaled down to a width of 2000 pixels.
- Auto-enhance should be switched OFF. Otherwise Google enhances the images automatically. This may be a good idea for crappy mobile phone images, but not for already perfectly created high quality equirectangulars!
Step 4: Publish your Photo Sphere to Maps Views
When your panorama has the required Photo Sphere meta information you can publish your panorama on Google Views. The first step to publish your panorama on Google Views is to upload it to your Google account. You do this using your Google Plus photos section

After the uploading process has finished you can control whether your image hsa been recognized as a Photo Sphere. This is the case when the Photo Sphere Symbl is shown on the image. This could look something like this:
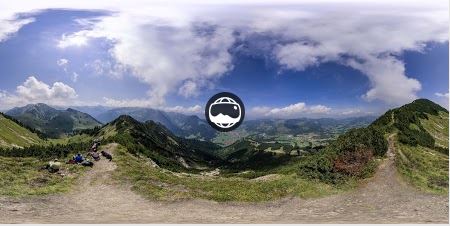
When you don’t see the icon in the middle of your image something went wrong!
When you see the icon you can proceed to publish your panorama on Google Views. Open the homepage and search the little blue camera icon on the upper right corner  . Press it and you will be able to select one of your Photo Spheres uploaded to Google Plus. After confirming the selection the panorama will be added to your gallery. However it may take some time for it to show up. The panorma will also be published on Google Maps – after a review process
Step 5: Share or embed the finished panorama
For the final step you open the newly uploaded panorama on your Views gallery. On the bottom left corner you see an area containing a small map of the location of the panorama. Search for the share icon  and press it. You’ll see a small window from which you can copy the required HTML iframe – code to embed the panorama on a web page.
Additional links
https://plus.google.com/117971837164857644538/posts/FDipsC8XeFQ
http://exsight360.com/blog/how-to-upload-non-android-360-panoramas-to-google-maps/
Hallo Markus,
Thanks for this post and info. I use the setting as you describe but on the Views page the pano is really bad quality (its a sphere but really wobbly ). The original stiched photo is 8000 x 4000 and about 4 mb. I used the google tool to add the mandatory xmp data. Also tried the batch droplet. But the results are the same. Do you have some advice?
Regards Erik
Hi Erik,
without more information I have to guess. However with the Google Sphere eco system it makes a great difference whether you publish your spheres with Google+ or Google Maps Views!
For comparison here is the same panorama on both platforms
Google+: https://plus.google.com/113390890074263132327/posts/HsAus7AxGG2
Google Maps Views: https://www.google.com/maps/views/view/113390890074263132327/photo/syf_mfAz69MAAAAGOp_jDQ
Compare the floor and you will easily see the difference! The uplpoaded Photo Sphere is 10000×5000 pixel in size. I published exactely the same one on both platforms. This is a known problem on the Google+ platform.
Hope this helps!
Best regards,
PanoTwin Markus
Hello Markus
Thanks for this great post 🙂
one quick question;
is there a maximum size in pixels that we can upload ???
I’ve been trying with my panos done with the Nikon D800E around … 13.000 wide and it does not work 🙁
Any info on that ?
THANKS again !!!!
Cheers from Rio
A
Hi Ayrton,
there seem to be some issues with uploading larger photo spheres to Google+. See the post here: https://plus.google.com/114624868362372722541/posts/fdwmAQFCpJn
This post indicates a maximum size of 11832px per 5916px: https://plus.google.com/101388107725448550582/posts/6wYCVDbdJpK
I successfully uploaded spheres with 10000 pixel on the long side. An examples is: http://www.panotwins.de/?p=5132
Also make sure you switched on “Upload my photos at full size” at your Google+ account settings!
All the best, PanoTwin Markus
But, All These functions are not available. Even the apps are not found ,, Please help…
Unfortunately you are right. Google changed lots of stuff regarding the publishing process for photo spheres. This post is no longer accurate. You can publish now with the Google Street View App: https://support.google.com/maps/answer/6273385
yo thanks for this post Markus! *thumbs up!*
THANKS Markus, I really appreciate your infos
Without it I wouldn’t be able today to upload so easy :
Thanks again
Cheers from Rio
Ayrton
BTW: I have been uploading with 14000 x 7000 and 82% JPG compression
🙂
A
Thank you for this post. I was wondering why my photospheres weren’t loaded as full size. Your article helped me to solve this problem.
Hi,
Thanks for sharing, but Google shuted down map view some time ago.
Did you found any solution to continue publishing photoshpere on Gmaps ?
Thanks
Tom
Hi Tom,
basically it’s not that hard to publish a Photo Sphere with Maps:
There are several options available:
One of the easiest ways is to search for a place in Maps. When the place is found there is a section with photos. A small icon should show which says: Add a photo. Just click it, upload a Photo Sphere and you’re done!
Prepare your Photo Sphere with the correct meta data beforehand!
One even easier way is to use the Street View App on Android or iOS:
https://support.google.com/maps/answer/7012050?ref_topic=6275604
Hope this helps!
PanoTwin Markus