Warning: WP_Syntax::substituteToken(): Argument #1 ($match) must be passed by reference, value given in /home/pacs/mma00/users/panotwins/doms/panotwins.de/subs/wp/wp-content/plugins/wp-syntax/wp-syntax.php on line 380
Warning: WP_Syntax::substituteToken(): Argument #1 ($match) must be passed by reference, value given in /home/pacs/mma00/users/panotwins/doms/panotwins.de/subs/wp/wp-content/plugins/wp-syntax/wp-syntax.php on line 380
Warning: WP_Syntax::substituteToken(): Argument #1 ($match) must be passed by reference, value given in /home/pacs/mma00/users/panotwins/doms/panotwins.de/subs/wp/wp-content/plugins/wp-syntax/wp-syntax.php on line 380
Preface
Some information on this post is outdated! Google Views has been migrated to Google Maps / Google Street View. Outdated information has been
struck through.
Google added a new feature to their set of web based applications recently. Publishing geo located spherical panoramas (aka Photo Spheres) on Views.
In another article, Markus already described the complete workflow which is needed to publish a panoramic image on Views and embed it into your website.
In this article I will describe several methods of writing and displaying the mandatory meta data which is used by a photo sphere.
The methods are
- Using the website http://street-sphere.appspot.com/
- Using ExifToolGUI, ExifTool and a special workspace definition file (Windows only, read and write)
- Using a batch file and ExifTool (command-line only, droplet for Windows available, read and write)
- Using a custom metadata panel within Photoshop (tested with PS C6, PS CC, read and write)
- ExifMetaLrPlugin for Lightroom (tested with Lr 4, read)
As a prerequisite we assume that you already have geotagged your images. It is important to note, that you need at least latitude, longitude and the heading in the final image. For example you can do this with Geosetter on Windows, or with ExifTool.
1. Using the website
Google set up the website http://street-sphere.appspot.com, where you can upload a JPG image and populate the required metadata. Unfortunately you have to be online and you have to up- and download the files. And not every filetype is supported. Otherwise it works fine, you just have to follow the instructions on the website.
2. ExifToolGUI and the GPano workspace
As ExifToolGUI is only available for Windows, you can skip to the other solutions if you run a different operating system on your machine.
First install the latest version of ExifTool by Phil Harvey. Be sure to get the stand-alone Windows executable, extract it to a path of your choice and rename it to
exiftool.exe
and copy it to a location which is already part of your search path.
Then install the latest version of ExifToolGUI as described on the homepage in section “2. ExifToolGUI” at the top of the page.
Save the following lines to a path of your choice with the filename
GPano.ini
[WorkspaceTags]
EXIF=-GUI-SEP
Image Width=-ImageWidth^[8000] Don't change unless you know, what you do!
Image Height=-ImageHeight^[4000] Don't change unless you know, what you do!
EXIF GPS=-GUI-SEP
GPS Latitude=-GPS:GPSLatitude^No Hint defined
GPS Longitude=-GPS:GPSLongitude^No Hint defined
Heading (EXIF)=-GPS:GPSImgDirection^[120.15] Direction in ° from [0] to [359.99]
GPano=-GUI-SEP
StitchingSoftware=-XMP-GPano:StitchingSoftware^[PTGui Pro 9.1.8]
ProjectionType=-XMP-GPano:ProjectionType^only [equirectangular] is currently supported by Google products
UsePanoramaViewer=-XMP-GPano:UsePanoramaViewer^[TRUE] if image should show as photosphere
Heading (Pano)=-XMP-GPano:PoseHeadingDegrees^[135] direction in the middle of the image in degrees. N=0, E=90, S=180, W=270
CroppedWidth=-XMP-GPano:CroppedAreaImageWidthPixels^[8000] for full spheres the same as FullPanoWidth
CroppedHeight=-XMP-GPano:CroppedAreaImageHeightPixels^[4000] for full spheres the same as FullPanoHeight
FullPanoWidth=-XMP-GPano:FullPanoWidthPixels^[8000] width of image canvas
FullPanoHeight=-XMP-GPano:FullPanoHeightPixels^[4000] heigth of image canvas
CroppedLeft=-XMP-GPano:CroppedAreaLeftPixels^[0] within full sphere
CroppedTop=-XMP-GPano:CroppedAreaTopPixels^[0] within full sphere
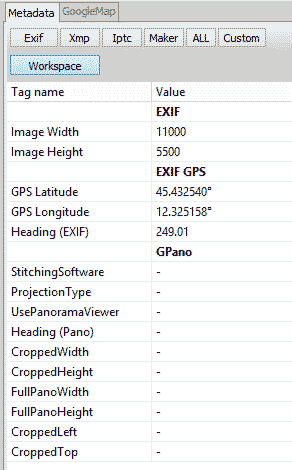
Open the file with ExifToolGUI (Menu>Program>Workspace definition file>Load…). Open the Metadata panel and open the Workspace. You should see the following workspace:
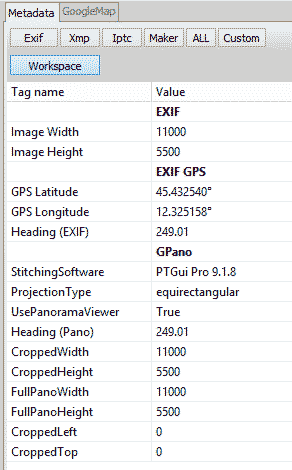
As reference the next screenshot shows an already populated photo sphere:
3. ExifTool via command-line
First install the latest version of ExifTool by Phil Harvey for your operating system.
Start exiftool from the command-line with the following parameters:
-ProjectionType="equirectangular" -UsePanoramaViewer="True" -"PoseHeadingDegrees<$exif:GPSImgDirection" -"CroppedAreaImageWidthPixels<$ImageWidth" -"CroppedAreaImageHeightPixels<$ImageHeight" -"FullPanoWidthPixels<$ImageWidth" -"FullPanoHeightPixels<$ImageHeight" -CroppedAreaLeftPixels="0" -CroppedAreaTopPixels="0"
Of course you also have to add a filename. If you supply the filename of a panoramic image in equirectangular format, which covers the full sphere, you get a photo sphere with the same name of the original image.
If you create a batch file on the desktop of a Windows machine with the following content:
FOR %%A IN (%*) DO ( "C:\Program Files (x86)\Geo\GeoSetter\tools\exiftool.exe" -ProjectionType="equirectangular" -UsePanoramaViewer="True" -"PoseHeadingDegrees<$exif:GPSImgDirection" -"CroppedAreaImageWidthPixels<$ImageWidth" -"CroppedAreaImageHeightPixels<$ImageHeight" -"FullPanoWidthPixels<$ImageWidth" -"FullPanoHeightPixels<$ImageHeight" -CroppedAreaLeftPixels="0" -CroppedAreaTopPixels="0" %%A ) PAUSE |
Then you have a droplet on which you can drop an equirectangular panoramic image which covers the full sphere and it gets populated with the required fields to be accepted as a photo sphere. If your image supplies the GPS-heading it’s also compliant with the requirements of Google-Maps.
4. Metadata panel and Photoshop
First you have to check the documentation of Adobes Custom File Info Panel to identify the proper location for the File Panels. On a Windows system running PS CC the files are located in
C:\Users\[Username]\AppData\Roaming\Adobe\XMP\Custom File Info Panels\4.0\panels
Create a directory named
photosphere
Create a file named
properties.xml
with the following content:
<!--?xml version="1.0" encoding="UTF-8"?--> <!-- Copyright 2013 by Jürgen Matern (/author/juergen/) This file is licensed under the Creative Commons Attribution ShareAlike 3.0 License (http://creativecommons.org/licenses/by-sa/3.0/). In short: you are free to share and make derivative works of the file under the conditions that you appropriately attribute it and that you distribute it only under a license identical to this one. Photosphere File Info Panel (properties.xml) This panel implements the specific XMP fields of Photospheres. Additionally it displays additional fields of the image as read only fields. --> <xmp_definitions xmlns:ui="http://ns.adobe.com/xmp/fileinfo/ui/"> <xmp_schema prefix="GPano" namespace="http://ns.google.com/photos/1.0/panorama/" label="$/Custom/GPano/Photosphere=Photosphere" description="$/Custom/GPano/Description/Photosphere=This schema displays the required properties for photospheres."> <xmp_property name="StitchingSoftware" category="external" label="$/Custom/GPano/StitchingSoftware=Stitching Software:" type="openchoice" ui:width="20%"> <xmp_choice raw_value="PTGui Pro 9.1.8" label="PTGui Pro 9.1.8"> <xmp_choice raw_value="PTGui 9.1.8" label="PTGui 9.1.8"> <xmp_choice raw_value="Hugin" label="Hugin"> </xmp_choice></xmp_choice></xmp_choice></xmp_property> <xmp_property name="ProjectionType" category="external" label="$/Custom/GPano/ProjectionType=Pano Projection:" description="$/Custom/GPano/Description/ProjectionType=Currently Google applications only support equirectangular projection." type="closedchoice" ui:width="20%"> <xmp_choice raw_value="equirectangular" label="$/Custom/GPano/equirectangular=equirectangular"> <xmp_choice raw_value="" label="$/Custom/GPano/none=none specified"> </xmp_choice></xmp_choice></xmp_property> <xmp_property name="UsePanoramaViewer" category="external" label="$/Custom/GPano/UsePanoramaViewer=Use Panorama Viewer:" type="boolean"> <xmp_property name="PoseHeadingDegrees" category="external" label="$/Custom/GPano/PoseHeadingDegrees=Heading (at center of image):" description="$/Custom/GPano/Description/PoseHeadingDegrees=This field is only mandatory for Google Maps." type="real" ui:width="15%"> <xmp_property name="CroppedAreaImageWidthPixels" category="external" label="$/Custom/GPano/CroppedAreaImageWidthPixels=Cropped Area Image Width:" type="integer" ui:format="{0} pixel" ui:width="15%"> <xmp_property name="CroppedAreaImageHeightPixels" category="external" label="$/Custom/GPano/CroppedAreaImageHeightPixels=Cropped Image Heigth:" type="integer" ui:format="{0} pixel" ui:width="15%"> <xmp_property name="FullPanoWidthPixels" category="external" label="$/Custom/GPano/FullPanoWidthPixels=Full Pano Width:" type="integer" ui:format="{0} pixel" ui:width="15%"> <xmp_property name="FullPanoHeightPixels" category="external" label="$/Custom/GPano/FullPanoHeightPixels=Full Pano Heigth:" type="integer" ui:format="{0} pixel" ui:width="15%"> <xmp_property name="CroppedAreaLeftPixels" category="external" label="$/Custom/GPano/CroppedAreaLeftPixels=Cropped Pixels Left:" type="integer" ui:format="{0} pixel" ui:width="15%"> <xmp_property name="CroppedAreaTopPixels" category="external" label="$/Custom/GPano/CroppedAreaTopPixels=Cropped Pixels Top:" type="integer" ui:format="{0} pixel" ui:width="15%"> </xmp_property></xmp_property></xmp_property></xmp_property></xmp_property></xmp_property></xmp_property></xmp_property></xmp_schema> <xmp_schema prefix="exif" namespace="http://ns.adobe.com/exif/1.0/" label="$/Custom/EXIF/Fieldname/ImageDimensions=Image Dimensions" description="$/Custom/EXIF/Description/IMageDimensions=This schema displays the image dimensions from the EXIF header."> <xmp_property name="PixelXDimension" category="internal" label="$/Custom/EXIF/Fieldname/PixelXDimension=Image Width:" type="integer" ui:format="{0} pixel"> <xmp_property name="PixelYDimension" category="internal" label="$/Custom/EXIF/Fieldname/PixelYDimension=Image Height:" type="integer" ui:format="{0} pixel"> <ui:separator> </ui:separator></xmp_property></xmp_property></xmp_schema> <xmp_schema prefix="exif" namespace="http://ns.adobe.com/exif/1.0/" label="$/Custom/EXIF/Fieldname/GPSCoordinates=GPS coordinates" description="$/Custom/EXIF/Description/GPSCoordinates=This schema displays the GPS coordinates from the EXIF header."> <xmp_property name="GPSLongitude" category="internal" label="$/Custom/EXIF/Fieldname/GPSLongitude=GPS longitude (camera):" type="text"> <xmp_property name="GPSLatitude" category="internal" label="$/Custom/EXIF/Fieldname/GPSLatitude=GPS latitude (camera):" type="text"> <xmp_property name="GPSAltitude" category="internal" label="$/Custom/EXIF/Fieldname/GPSAltitude=GPS altitude (camera):" type="text"> <xmp_property name="GPSImgDirection" category="internal" label="$/Custom/EXIF/Fieldname/GPSImgDirection=GPS image direction:" type="real"> <xmp_property name="GPSDestLongitude" category="internal" label="$/Custom/EXIF/Fieldname/GPSDestLongitude=GPS longitude (motif):" type="text"> <xmp_property name="GPSDestLatitude" category="internal" label="$/Custom/EXIF/Fieldname/GPSDestLatitude=GPS latitude (motif):" type="text"> </xmp_property></xmp_property></xmp_property></xmp_property></xmp_property></xmp_property></xmp_schema> </xmp_definitions> |
Create a second file named
manifest.xml
with the following content:
<!-- Copyright 2013 by Jürgen Matern (/author/juergen/) This file is licensed under the Creative Commons Attribution ShareAlike 3.0 License (http://creativecommons.org/licenses/by-sa/3.0/). In short: you are free to share and make derivative works of the file under the conditions that you appropriately attribute it and that you distribute it only under a license identical to this one. Photosphere File Info Panel (manifest.xml) --> <xfi:fileinfo xmlns:xfi="http://ns.adobe.com/xmp/fileinfo/"> <xfi:panels> <xfi:panel name="Photosphere" label="Photosphere" description="Properties for Photospheres" type="generic" version="1.0.5" panellibrary="generic" panelclass="examples.panels.generic.GenericPanel" propertydescriptionfile="properties.xml" localizationfile="Photosphere" modifydate="2013-08-25Z" visible="true"> </xfi:panel> </xfi:panels> </xfi:fileinfo> |
Then open the file info dialog of Photoshop. When all the metadata is missing, the new dialog looks like this:

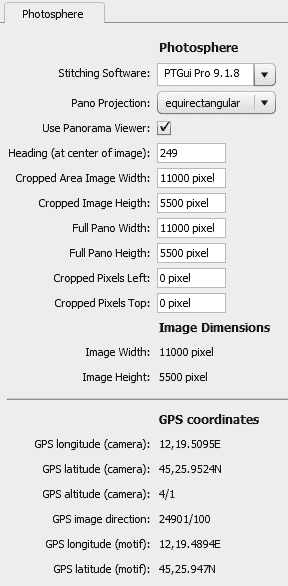
And the following screenshot shows the dialog, when the metadata fields are already populated.
5. ExifMetaLrPlugin for Lightroom
First install the latest version of ExifTool by Phil Harvey for your operating system. Then install the latest version of ExifMetaLrPlugin. Configure the plugin to display the metadata. Unfortunately this solution is read only at the time of the writing of the article.
Thank you very much. Gracias!
Thanks
Thanks a lot for these bright explanations, Jürgen !
Thanks… This was a huge help!
I’m having trouble turning the Photoshop process into an action for adding this photosphere metadata in batch to a directory of many panos. Anyone have tips on this?
Maybe point 3. from the article helps? A command line with exiftool can do the trick. The batch file however would be a little different, when you are not using Windows!
I’ve followed your instructions for ExifToolGui and can see the additional workspace fields, but when I enter any values, the ‘Save’ button is greyed out. Any idea why?
To answer my own question: Hit return after entering a value into the bottom box, then when you’ve made the necessary changes, click on save to update all the image metadata!
just a note for anyone using photoshop cs4
the file path should be this:
C:\Users\[Username]\AppData\Roaming\Adobe\XMP\Custom File Info Panels/2.0/panels/
make a folder called photosphere
go to http://www.adobe.com/devnet/xmp.edu.html and download “XMP FileInfo SDK 4.4.2 (for CS4)” .unzip it and copy everything from tools/generic (there should be a total of 5 files and 2 folders) to the above photosphere folder
replace the manifest.xml and properties.xml files with the ones on this page
if you open photoshop you’ll see a tab for photosphere on the file info screen but the panel won’t show up in photoshop until you add a trust file
close photoshop
go here:
C:\Users\[Username]\AppData\Roaming\Macromedia\Flash Player\#Security\FlashPlayerTrust\
create a text file with this one line in it (remember to replace [username])
C:\Users\[Username]\AppData\Roaming\Adobe\XMP\Custom File Info Panels\2.0\panels\
save it as photosphere.cfg
you’ve now told flash it’s ok to open the panel,open photoshop and the panel should work now
if you want to be able to add/edit the gps data from photoshop open properties.xml and on these lines change “internal” to “external” then save it
<xmp_property name="GPSLongitude" category="internal"
<xmp_property name="GPSLatitude" category="internal"
<xmp_property name="GPSAltitude" category="internal"
<xmp_property name="GPSImgDirection" category="internal"
<xmp_property name="GPSDestLongitude" category="internal"
<xmp_property name="GPSDestLatitude" category="internal"
Hi,
I’ve tried the Exiftool-Batch but it it warned me the following:
…
Warning: Tag ‘ProjectionType’ does not exist
Warning: Tag ‘UsePanoramaViewer’ does not exist
Warning: Tag ‘CroppedAreaLeftPixels’ does not exist
Warning: Tag ‘CroppedAreaTopPixels’ does not exist
Warning: No writable tags found – C:/…/MY.jpg
0 image files updated
1 image files unchanged
How could I make exiftool creates the missing Tags?
Could you please give me the edited batch file text?
Thanx a lot,
Thomas
Sorry, I used an old version of exiftool from 2011.
This old version did not know these Tags yet. So the warning meant, that those not existing Tags in the year 2011 were not defined in the standard .
Thanks for replying to yourself with the solution. Helped me, having had the same problem! Cheers, Hennes
Is it possible to add the required metadata to non-360 panoramic images? I’ve made quite a few in the past using Autopano, but they lack the XMP tags. They do contain some FOV and similar info in an ASCII string. Maybe that can be used as values for the GPano tags?
This should be possible, however I never actually tried it myself. I think you may need do do some calculations to get everything right. I’m not sure what happens when the values are not correct. Maybe you could experiment using your phone and taking a partial photo sphere?
Thanks for this tutorial, makes it easy to convert panoramas for Samsung Gear VR! 🙂
hi,
i am trying to add metadata to a equirectangular image, in order to add it too street view.
i tried all methods, without success…
the easiest one seems to be usinf exiftoolgui (method n°2), but when i change the values in the workspace and i clic the save button, i get this message, for each value i try to change:
Warning: Tag ‘gpsgpslatitude’ does not exist
Warning: Tag ‘gpsgpslongitude’ does not exist
anyone can help me?
thank you,
regards,
ale
Hi ale,
the tags should read:
-Gps:GPSLatitude
and
-Gps:GPSLongitude
So it seems that you omitted the colon…
I hope that helps
Jürgen
Thanks a lot, you made my day. I’ve been trying to import panorama to Google Sphere for a while, solution 3 did the trick !
FWIW ExifToolGUI (v 0.5) and ExifTool work quit well on OSX (10.11). By following the websites instructions I was able to install both packages in less than 5 minutes. One caveat though, if the ExifToolGUI app crashes when opening the first time locate and delete the ‘pyexiftoolgui.plist’ file in your Preferences. The next time the app is loaded it will recreate with the proper settings.
Wow. just skimming through this it seems highly complicated!! I would love to publish some of my panos but none of these seems options seem to explain how to on a mac. And the website – http://photo-sphere.appspot.com has an error. I have been searching for months to try and publish a pano. I submitted an equalrectangular image but it came out as a flat image. Clearly I am totally confused by googles submission process. Can anyone please explain a simpler process??
Hi Jason,
have you tried http://street-sphere.appspot.com/ also?
One easy way is to use the Street View App on Android or iOS:
https://support.google.com/maps/answer/7012050?ref_topic=6275604
Hope this helps!
PanoTwin Markus
Thats a good way, but not everyone is able to use it. Mobiles without a gyroscope can’t use it.
Hi,
i tested it but my result is very distorted. What do I did wrong? Can you anyone help me? The Image: https://goo.gl/photos/MS1AXkunWmJdSjij9
Hi Retch,
the problem with your image is the wrong Meta Data!
See the fixed result here: https://goo.gl/photos/5DSkGME6JvZxsCjj6
The meta data of your image had the following relevant values:
This however does not describe your panorama correctly!
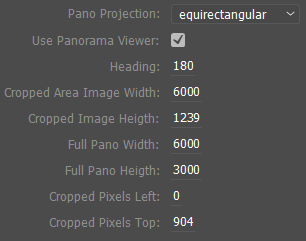
Here are the values I used:
I changed the following values:
Full Pano Height: 3000
Cropped Pixels Top: 904
The problem is, that you always have to consider a full sphere! Your panorama however was a cylindrical part of a full sphere. Thus you have to define the visible portion of your cylindrical strip inside the full sphere.
For a detailed description of the values see here: https://developers.google.com/streetview/spherical-metadata
I hope this helps,
PanoTwin Markus
Thank you Markus!
What metadata editing tool do you use? It looks like photoshop or lightroom. I think I understand where the failure was.
By the way i used google, it is possible that you are from Germany?
Dann hätten wir uns das englische sparen können :’)
Ja das wäre auch gut auf Deutsch gegangen… Ich antworte jetzt trotzdem mal auf Englisch…
For editing the Metadata information I usually use Photoshop with a custom meta data panel. How to activate this panel you can read in this post:
http://www.panotwins.de/technical/how-to-add-mandatory-photo-sphere-meta-data-to-an-equirectangular-image-photoshop-cc-2014/
Hey,
thanks for the great tutorial. It worked for me totaly fine with my fist panorama, however the second one doesn’t get displayed as a photoshere (https://goo.gl/photos/VKaWpw6xRnmW8NR6A). Do you have any idea whats wrong with the picture? Thanks!
Hi Leo,
the problem with your image is the wrong Meta Data!
See the fixed result here: https://goo.gl/photos/dvaGPEpXf256w3RT7
The meta data of your image had the following relevant values:
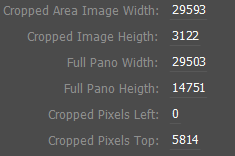
This however does not describe your panorama correctly!
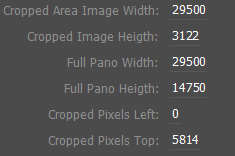
Here are the values I used:
I scaled the image down 3 pixels to a width of 29500 and changed the following values:
Cropped Area Image Width: 29500
Full Pano Width: 29500
Full Pano Height: 14750
I think the two problems were:
1) Your aspect ratio was 29503×14751 This is not 2×1, which it should always be for an equirectangular panorama!
2) Your value for Cropped Area Image Width was larger than the complete panos width Full Pano Width
I hope this helps,
PanoTwin Markus
PS: I like your location. This is where I grew up. Bad Hindelang in Bavaria, the south of Germany. I shot some spherical panoramas quite nearby: https://goo.gl/maps/ySYDcapuagE2 https://goo.gl/maps/utnaaisaJGz and https://goo.gl/maps/UKMm8eQJDaM2
I used your batch file with Exiftools, to add the metadata for Google 360 viewer to photorealistic Archviz renders from Blender. Works GREAT, thank you.
Before I had to open Hugin ad photos, bla, bla,…. Thanks again
Hi there! Any solutions todo this on a Mac? Website does not work, and I cannot find the place to add the XML for Photoshop on the Mac
Thank you very much!
The Exiftool method worked flawless.