The following two images show the entrance of Munich’s old South Cemetary. You can view the interactive spherical panorama here. The projection is both times stereographic.
")
")
 Show on map
This is the blog of the PanoTwins
The following two images show the entrance of Munich’s old South Cemetary. You can view the interactive spherical panorama here. The projection is both times stereographic.
Show on map
The Alter Südfriedhof is an old Munich cemetary. Dead bodies have been burried here between 1563 and 1943. Nowadays it serves as a quiet sanctuary in the busy city centre. The panorama shows the entrance between the older and the newer part of the cemetary.
[pano file=”https://www.panotwins.de/wp-content/panos/MMatern_20121117_0112_Panorama.xml” preview=”https://www.panotwins.de/wp-content/panos/MMatern_20121117_0112_Panorama.jpg”]
Show on map
This image shows a stereographic projection of this panorama.
 Show on map
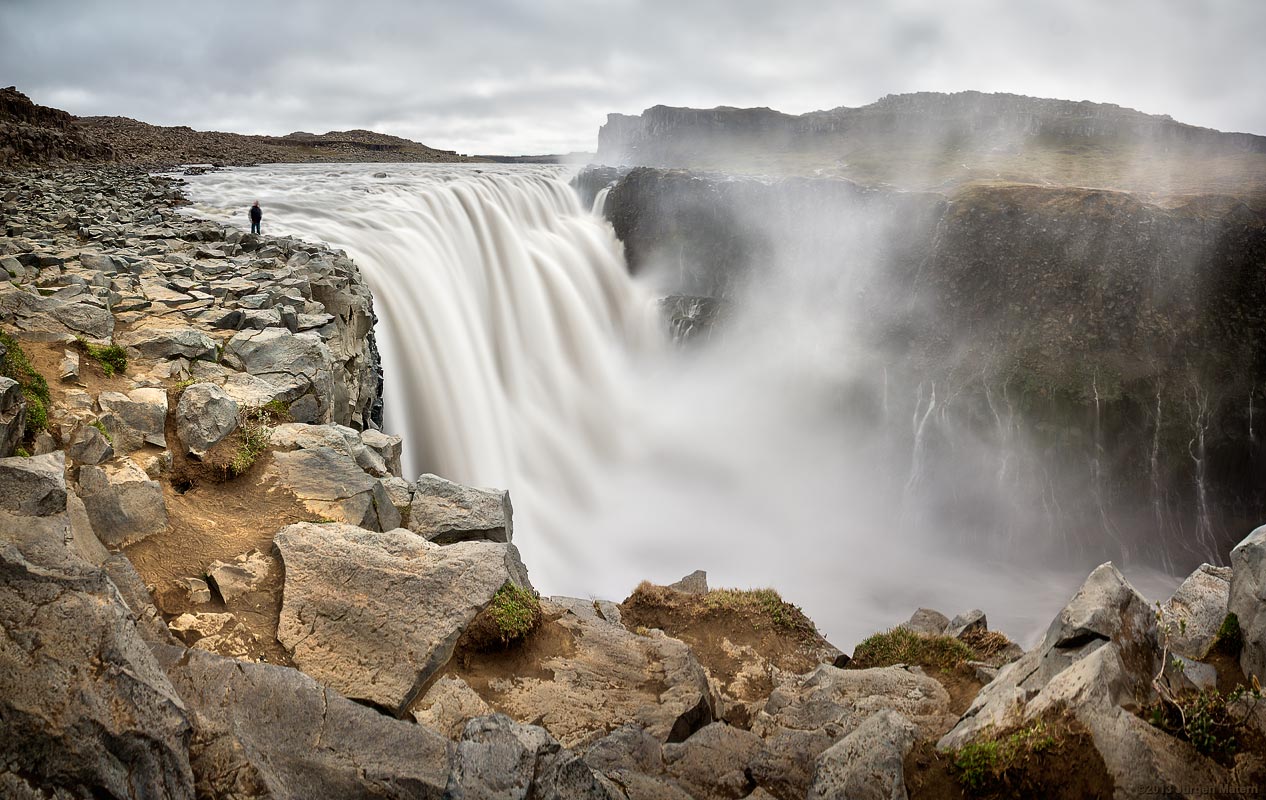
This is a long exposure at Dettifoss. It was taken with a neutral density filter and the 18-55 kit lens at 18 mm. As the exposure time is 4 seconds I also used a tripod. The image is stitched from three images in portrait mode. I used an additional image for the guy standing at the waterfall. The resulting image is 9492 x 6000 pixels.
Show on map
Click on the thumbnail image to open the cinemagraph in a higher resolution. The original footage has been taken from a Full- HD movie. I exported some seconds of the film to individual images and used The Gimp to create this animated GIF image.

In a post from yesterday I analyzed a series of images from the Voigtländer Ultra Wide Heliar 12mm/5.6 on my Sony NEX-7 in order to identify the best aperture for maximum resolution. I wondered about the impact of my corrections at the stage of post-processing the images. To answer this question I picked the image taken with an aperture of f=8 and compare a uncorrected and a corrected version of the image.
While post-processing the uncorrected image I did the following:
 with marked crop locations, taken with CV 12mm/5.6 (at f=8) on Sony NEX-7")
While post-processing the corrected image I did the following:
 with marked crop locations, taken with CV 12mm/5.6 (at f=8) on Sony NEX-7")
For each of the marked locations in the full image I extracted a square (250 pixel * 250 pixel) which I will present at it’s original resolution. These images are not sharpened except for the same input sharpening with the raw converter. They are saved for web with a quality-setting of 60%.
")
")
In my opinion it’s clearly visible that the applied correction didn’t reduce the resolution of the image and therefore the identification of the best aperture for maximum resolution is not affected by these corrections.
Recently I started using a Voigtländer Ultra Wide Heliar 12mm/5.6 on my Sony NEX-7. In two other articles I already described how to configure your NEX-7 for maximum assistance with manual lenses, how to attach the lens to the camera and how to post-process the images to eliminate the magenta cast in the corners.
As I am aware of the fact, that any combination of lens and body has it’s maximum sharpness at a specific aperture I did a series of test images to find this maximum. My subject was the front of a building. It has a nearly flat surface and the clinker bricks contain a lot of fractal details. The camera was mounted on a tripod whose distance to the wall was approximately 15 meters (approximately 50 feet). Images were taken with self-timer to prevent any camera-shake. Focus was set at the first exposure which was taken at f=5.6. The image quality was set to RAW (6,000 pixel * 4,000 pixel).
While post-processing the images I did the following:
The following image (at f=8) was scaled to 1,500 pixel * 1,000 pixel, sharpened and saved for web with a quality-setting of 60%.
For each of the marked locations in the full image I extracted a square (250 pixel * 250 pixel) which I will present at it’s original resolution. These images are not sharpened except for the same input sharpening with the raw converter. They are saved for web with a quality-setting of 60%.


In my opinion it’s easy to see that the Voigtländer Ultra Wide Heliar 12mm/5.6 reaches it’s maximum sharpness at an aperture around 8 on a Sony NEX-7. If you stop further down diffraction starts to limit the resolution. For further reading on this issue try to start at this page at diglloyd.com.
Show on map
Today I was searching for an image of the subway station Westfriedhof in Munich. As I browsed my database I found the following image of Panotwin Markus shooting the Munich subway station Westfriedhof with a double monopod setup.

The final panorama is hosted at the WWP event ‘Color’.
Show on map
I was searching for a first project I wanted to shoot with my new gadget. The remote trigger for the Sony NEX 5 I presented in the previous post. I decided to shoot a timelapse video. As I did not have my time lapse trigger with me but a laptop I applied some changes to the code and the time lapse function for the Ultimate Trigger was born.
I programmed a fixed interval of 10 minutes between each shot, set the camera to aperture priority mode, set the focus to manual and started shooting for 24 hours. Every now and then I checked the progress and had some minor problems:
Apart from these minor flaws I am satisfied with the result you can see here:

